Source repo: ciml-summer-institute-2022 | Branch:
main| Last synced: 2026-04-24 10:27:17.425 UTC
2022 CIML Summer Institute: CONDA Environments and Jupyter Notebook on Expanse: Scalable & Reproducible Data Exploration and ML
Session: 3.3_conda_environments_and_jupyter_notebooks_on_expanse
Date: June 28, 2022
Presented by: Peter Rose (pwrose @ucsd.edu)
Reading and Presentations:
- Lecture material:
- Video Recording: will be made available as soon as possible
- Source Code/Examples: df-parallel, notebooks-sharing
TASK 1A: Launch Jupyter Lab on Expanse using a CONDA environment
-
Open a Terminal Window ("expanse Shell Access") through the Expanse Portal
-
Clone the Git repository df-parallel
git clone https://github.com/sbl-sdsc/df-parallel.git
-
Launch Jupyter Lab using the Galyleo script
This script will generate a URL for your Jupyter Lab session.
galyleo launch --account ${CIML_ACCOUNT} --reservation ${CIML_RESERVATION_GPU} --qos ${CIML_QOS_GPU} --partition gpu-shared --cpus 10 --memory 92 --gpus 1 --time-limit 00:30:00 --conda-env df-parallel-gpu --conda-yml "${HOME}/df-parallel/environment_gpu.yml" --mamba
The arguments
--reservation ${CIML_RESERVATION_GPU} --qos ${CIML_QOS_GPU}are only active during the CIML workshop. Remove these arguments when running this example outside of the workshop and specify your project account number.
- Open a new tab in your web browser and paste the Jupyter Lab URL.
You should see the Satellite Reserver Proxy Servive page launch in your browser.
- In your Zoom session, select "Yes" under Reactions after you complete these steps.
TASK 1B: Run Notebooks in Jupyter Lab
For this task you will compare the runtime for a simple data analysis using 5 dataframe libraries.
-
Go to the Jupyter Lab session launched in TASK 1A
Navigate to the
df-parallel/notebooksdirectory. -
Copy the sample file
Run the
1-FetchDataCIML.ipynbnotebook to copy a dataset to the local scratch disk on the GPU node. -
Run the Dataframe notebooks
Run the following Dataframe notebooks and write down the runtime shown at the bottom of each notebook.
2-PandasDataframe.ipynb
3-DaskDataframe.ipynb
4-SparkDataframe.ipynb
5-CudaDataframe.ipynb
6-DaskCudaDataframe.ipynb
-
Shutdown Jupyter Lab
File -> Shutdownto terminate the process -
In your Zoom session, select "Yes" under "Reactions" after you complete these steps.
TASK 2A: Create a packed CONDA environment
Here we will run an ML model to predict the protein fold class from a protein sequence.
- Clone the Git repository notebooks-sharing
git clone https://github.com/sdsc-hpc-training-org/notebooks-sharing.git
-
Create a packed Conda environment
This script will launch a batch job to create the packed environment
notebooks-sharing.tar.gzin your home directory.
./notebooks-sharing/pack.sh --account ${CIML_ACCOUNT} --conda-env notebooks-sharing --conda-yml "${HOME}/notebooks-sharing/environment.yml"
This job will take about 4:30 minutes to complete
-
On the Expanse Portal, check that your job is running.
-
In your Zoom session, select "Yes" under "Reactions" after you complete these steps.
TASK 2B: Run a packed CONDA environment
- Launch Jupyter Lab using the packed Conda environment
galyleo launch --account ${CIML_ACCOUNT} --reservation ${CIML_RESERVATION_CPU} --partition shared --cpus 8 --memory 16 --time-limit 01:00:00 --conda-env notebooks-sharing --conda-pack "${HOME}/notebooks-sharing.tar.gz"
-
Run the notebooks
In Jupyter Lab, navigate to the
notebooks-sharing/notebooksdirectory and run the following notebooks.
1-CreateDataset.ipynb
2-CalculateFeatures.ipynb
3-FitModel.ipynb
4-Predict.ipynb
-
Do not shutdown Jupyter Lab. You will use it for TASK 2C!
-
In your Zoom session, select "Yes" under "Reactions" after you complete these steps.
TASK 2C: Run Jupyter Lab in batch
-
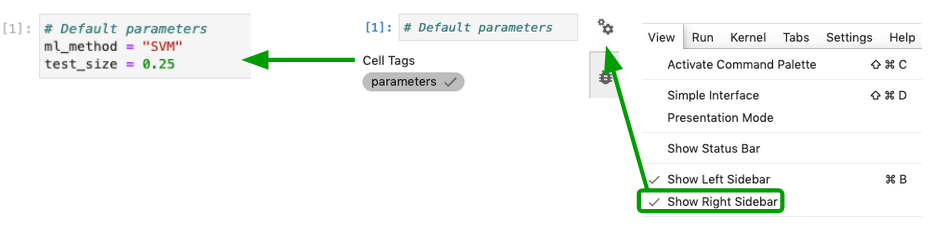
Parameterize the 3-FitModel.ipynb
Add a "parameters" tag to cell
[1].-
Select the cell to parameterize
-
Click the property inspector in the right sidebar (double gear icon)
-
Type “parameters” in the “Add Tag” box and hit “Enter”.
-
Save the notebook
-
- Review the
notebooks-sharing/batch.shscript
Note how the 3-FitModel.ipynb notebook has been parameterized to run both
SVMandLogisticRegression.
-
Submit the batch script with sbatch
From your home directory, run the following command
sbatch ./notebooks-sharing/batch.sh
- Using the Expanse Portal, monitor the progress of your job
This jobs takes about 3 minutes to complete
-
Compare the performance of the LogisticRegression model with the SVM model
When the job is complete, use your Jupyter Lab session from TASK 2B to navigate to the
notebooks-sharing/resultsdirectoryOpen the
3-FitModel-LogisticRegression.ipynband the3-FitModel-SVM.ipynbnotebooks and compare the performance of the two models. -
In your Zoom session, select "Yes" under "Reactions" after you complete these step