default-jupyter-launch-methods-are-NOT-SECURE
Source repo: hpc-security | Branch:
master| Last synced: 2026-04-24 10:27:17.425 UTC
Why Default Jupyter Notebooks Launched on a Remote HPC Cluster are NOT SECURE
This section described how to connection between the browser on your local host (laptop) to a Jupyter service running on Comet over HTTP and demonstrates why the connection is not secure.
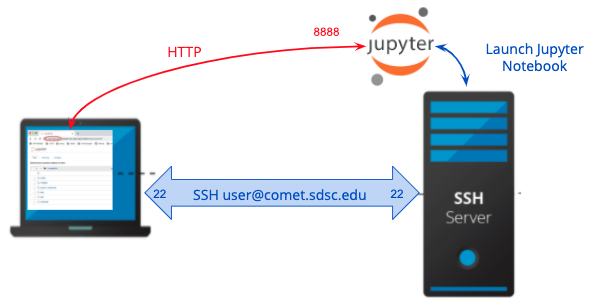
google chrome has many local ports open in the range of 7713 - 7794. They are all connect to 80 or 443 on the other end.
Log onto comet.sdsc.edu
ssh -Y -l `username` comet.sdsc.edu
- create a test directory, or
cdinto one you have already created - Clone the examples repository:
git clone https://github.com/sdsc-hpc-training-org/notebook-examples.git
launch a notebook on the login node:
Run the jupyter command. Be sure to set the --ip to use the hostname, which will appear in your URL :
[mthomas@comet-14-01:~] jupyter notebook --no-browser --ip=`/bin/hostname`
You will see output similar to that shown below:
[I 08:06:32.961 NotebookApp] JupyterLab extension loaded from /home/mthomas/miniconda3/lib/python3.7/site-packages/jupyterlab
[I 08:06:32.961 NotebookApp] JupyterLab application directory is /home/mthomas/miniconda3/share/jupyter/lab
[I 08:06:33.486 NotebookApp] Serving notebooks from local directory: /home/mthomas
[I 08:06:33.487 NotebookApp] The Jupyter Notebook is running at:
[I 08:06:33.487 NotebookApp] http://comet-14-01.sdsc.edu:8888/?token=6d7a48dda7cc1635d6d08f63aa1a696008fa89d8aa84ad2b
[I 08:06:33.487 NotebookApp]  or http://127.0.0.1:8888/?token=6d7a48dda7cc1635d6d08f63aa1a696008fa89d8aa84ad2b
[I 08:06:33.487 NotebookApp] Use Control-C to stop this server and shut down all kernels (twice to skip confirmation).
[C 08:06:33.494 NotebookApp]

    To access the notebook, open this file in a browser:
        file:///home/mthomas/.local/share/jupyter/runtime/nbserver-6614-open.html
    Or copy and paste one of these URLs:
        http://comet-14-01.sdsc.edu:8888/?token=6d7a48dda7cc1635d6d08f63aa1a696008fa89d8aa84ad2b
     or http://127.0.0.1:8888/?token=6d7a48dda7cc1635d6d08f63aa1a696008fa89d8aa84ad2b
[I 08:06:45.773 NotebookApp] 302 GET /?token=6d7a48dda7cc1635d6d08f63aa1a696008fa89d8aa84ad2b (76.176.117.51) 0.74ms
[E 08:06:45.925 NotebookApp] Could not open static file ''
[W 08:06:46.033 NotebookApp] 404 GET /static/components/react/react-dom.production.min.js (76.176.117.51) 7.39ms referer=http://comet-14-01.sdsc.edu:8888/tree?token=6d7a48dda7cc1635d6d08f63aa1a696008fa89d8aa84ad2b
[W 08:06:46.131 NotebookApp] 404 GET /static/components/react/react-dom.production.min.js (76.176.117.51) 1.02ms referer=http://comet-14-01.sdsc.edu:8888/tree?token=6d7a48dda7cc1635d6d08f63aa1a696008fa89d8aa84ad2b
Notice that the notebook URL is using HTTP, and when you connect the browser on your local sysetm to this URL, the connection will not be secure. Note: it is against SDSC Comet policy to run applications on the login nodes, and any applications being run will be killed by the system admins. A better way is to run the jobs on an interactive node or on a compute node using the batch queue (see the Comet User Guide), or on a compute node, which is described in the next sections.
Obtain an interactive node:
Jobs can be run on the cluster in batch mode or in interactive mode. Batch jobs are performed remotely and without manual intervention. Interactive mode enable you to run/compile your program and environment setup on a compute node dedicated to you. To obtain an interactive node, type:
srun --pty --nodes=1 --ntasks-per-node=24 -p compute -t 02:00:00 --wait 0 /bin/bash
You will have to wait for your node to be allocated - which can take a few or many minutes. You will see pending messages like the ones below:
srun: job 24000544 queued and waiting for resources
srun: job 24000544 has been allocated resources
[mthomas@comet-18-29:~/hpctrain/python/PythonSeries]
You can also check the status of jobs in the queue system to get an idea of how long you may need to wait.
Launch the Jupyter Notebook application.
this application will be running on comet, and you will be given a URL which will connect your local web browser the interactive comet session:
jupyter notebook --no-browser --ip=`/bin/hostname`
This will give you an address which has localhost in it and a token. Something like:
http://comet-14-0-4:8888/?token=xxxxxxxxxxxxxxxxxxxxxxxxxxxxxxxxxxxxxxxxxx
You can then paste it into your browser. You will see a running Jupyter notebook and a listing of the notebooks in your directory. From there everything should be working as a regular notebook.
This token is your auth so don't email/send it around. It will go away when you stop the notebook.
To learn about Python, run the Python basics.ipynb notebook.
To see an example of remote visualization, run the Matplotlib.ipynb notebook!
Access the node in your browser
Copy the the URL above into the browser running on your laptop.
Use your jupyterlab/jupyter notebook server!
Enjoy. Note that your notebook is unsecured.
Batch Script / Compute Node
How to access a node directly from the browser
You can access a jupyter notebook directly from your browser after starting it on a comet node. This method is insecure, and will result in a notebook served over http, which is not something you want to be using on a regular basis.
First, log onto comet using SSH tunneling method.
Copy the batch script example
#!/usr/bin/env bash
#SBATCH --job-name=tensorflow-compute
#SBATCH --partition=compute
#SBATCH --time=00:30:00
#SBATCH --nodes=1
#SBATCH --ntasks-per-node=24
#SBATCH --output=tensorflow-compute.o%j.%N
module purge
module list
printenv
time -p singularity exec /share/apps/compute/singularity/images/tensorflow/tensorflow-cpu.simg jupyter lab --no-browser --ip="$(hostname)"
This example uses the tensorflow singularity container available on comet. You can use any container you want. If you check out /share/apps/computer/singularity you can find many useful containers. The key part of this example is how the jupyter lab is started at the end - jupyter lab --no-browser --ip "${hostname}".
Submit batch script to the queue
Simply run sbatch run-jupyter-tensorflow-compute.sh
One thing you may want to do is change the script to be --partition=debug if you want a shorter wait time.
Access the Jupyter Service from your local browser
Wait for the job to be submitted to the queue. Then, look in the output file created by the batch job, which looks something like tensorflow-compute.o%j.%N (for the example above). Inside this file, you will see the output of the jupyter lab command, which contains the port number that the jupyterlab server is running on, as well as the token you will need for authentication. You will also need to know the comet node name that you are logged onto. You can view this by typing this command: squeue -u $USER. Under the NODELIST section you can see the comet node name.
Open up a new tab in your browser, and type in the following: http://comet node name.sdsc.edu:port number``. The jupyter notebook page should show up, and you can now paste in the token from the output file.
Use your jupyterlab/jupyter notebook server!
Enjoy. Note that your notebook is unsecured. You can make this connection secure by using SSH Tunneling, which is described in the next section.